Halflife Rally Level Design Tutorial - Basic |
|||||
Introduction |
|||||
| This is a basic tutorial on how to create nice looking smooth roads for Halife 2. This tutorial assumes you know the basics of Hammer, things like, using the vertice tool, creating and editing displacements. | |||||
|
Step 1 - Creating our first brushes |
|||||
|
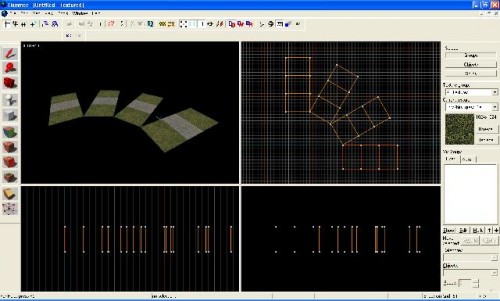
Create a basic road in Hammer (my dimensions are 384 width, 512 long and 256 high). Then copy this piece of road and paste 2 copies, putting one either side of the road. It should look something like Tip: Texture the road now and the brushes either side of the road. It not that big of a deal to not texture the 2 side brushes but make sure you at least texture your road correctly because we are going to be copying and pasting this brush quite a bit.
|
|||||
|
Step 2 - Creating our displacements |
|||||
|
Now turn the brushes into displacements. Once I have created the displacements I usually group the 3 together, will make it a little easier in the long run. After grouping the displacements copy and paste, then rotate it 30 degrees. Align the new displacements how a normal corner should look (see the picture for a finished look of step 2) Now make a copy of your new displacement and then rotate this new one 30 degrees, align it like the first one. Now make 1 more copy of your new displacement and rotate it a further 30 degrees, and align it like the other ones. You will end up with something like You now have something that is start to resemble a corner
|
|||||
|
Step 3 - Joining the Corner Together |
|||||
|
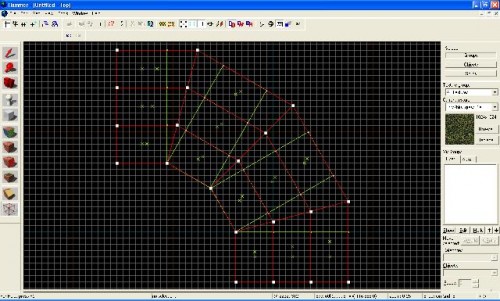
There can be a couple of ways to do this, depending on how your Hammer is set up (at least mine is not set up like it used to be so now I have to do an extra step) Select all your displacements and copy and paste it, align it exactly on top of your other one, so now you have to copies of you corner. Seems pointless, but I will get back to this. Now select 1 copy of your corner and open the vertex tool. Basically now we want to join the corner together, so you will have something that looks like this.
Now the reason we made that extra copy of the corner was so that when we were joining the corner together, we could keep the angle of the displacements correctly. After you have completed the vertex manipulation you can go ahead and delete the extra copy of the corner |
|||||
|
Step 4 - Finishing up |
|||||
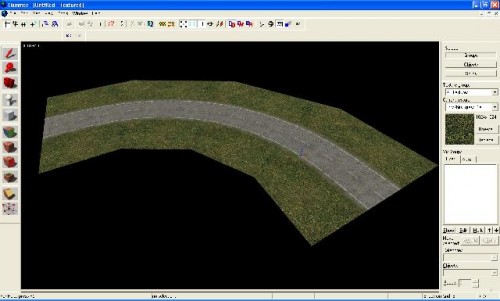
There is now only 1 more thing to do. Select the whole of your corner, open up the displacement editing tool and click the subdivide button. You will magically see your corner turn from something pretty average to a beautiful smooth corner
|
|||||